내배캠/GAS(Gameplay Ability System)
GAS_06_Ability Input Action 바인딩 및 GA(무기장착) 활성화
동그래님
2025. 5. 6. 11:52
📌 Ability를 Input 바인딩
🔹 RPGInputComponent.h
더보기
#pragma once

#include "CoreMinimal.h"
#include "EnhancedInputComponent.h"
#include "DataAssets/Input/DataAsset_InputConfig.h" //InputConfig 헤더 추가
#include "RPGInputComponent.generated.h"

UCLASS()
class RPG_API URPGInputComponent : public UEnhancedInputComponent
{
	GENERATED_BODY()

public:
	template<class UserObject, typename CallbackFunc>
	void BindNativeInputAction(
		const UDataAsset_InputConfig* InInputConfig, // Input Action 정의가 담긴 Data Asset
		const FGameplayTag& InInputTag, // 바인딩할 Action을 찾기 위한 Tag
		ETriggerEvent TriggerEvent, // Pressed, Released 등 언제 바인딩 함수가 호출될지
		UserObject* ContextObject, // 함수가 실행될 객체
		CallbackFunc Func); // 바인딩할 동작 함수

	template<class UserObject, typename CallbackFunc>
	void BindAbilityInputAction(
		const UDataAsset_InputConfig* InInputConfig,
		UserObject* ContextObject,
		CallbackFunc InputPressedFunc,
		CallbackFunc InputReleasedFunc);
};

template<class UserObject, typename CallbackFunc>
inline void URPGInputComponent::BindNativeInputAction(
	const UDataAsset_InputConfig* InInputConfig,
	const FGameplayTag& InInputTag,
	ETriggerEvent TriggerEvent,
	UserObject* ContextObject,
	CallbackFunc Func)
{
	checkf(InInputConfig, TEXT("RPGInputComponent: Input config data asset is null, can not proceed with binding"));

	if (UInputAction* FoundAction = InInputConfig->FindNativeInputActionByTag(InInputTag))
	{
		BindAction(FoundAction, TriggerEvent, ContextObject, Func);
	}
}

template<class UserObject, typename CallbackFunc>
inline void URPGInputComponent::BindAbilityInputAction(
	const UDataAsset_InputConfig* InInputConfig,
	UserObject* ContextObject,
	CallbackFunc InputPressedFunc,
	CallbackFunc InputReleasedFunc)
{
	checkf(InInputConfig, TEXT("RPGInputComponent: Input config data asset is null, can not proceed with binding"));

	for (const FRPGInputActionConfig& AbilityInputActionConfig : InInputConfig->AbilityInputActions)
	{
		if (!AbilityInputActionConfig.IsValid()) continue;

		BindAction(AbilityInputActionConfig.InputAction, ETriggerEvent::Started, ContextObject, InputPressedFunc, AbilityInputActionConfig.InputTag);
		BindAction(AbilityInputActionConfig.InputAction, ETriggerEvent::Completed, ContextObject, InputReleasedFunc, AbilityInputActionConfig.InputTag);
	}
}

기존에 Custom Input Component에 Ability를 바인딩하는 "BindAbilityInputAction" 함수를 만들었었다.
함수 내부를 보면 DA_InputConfig의 AbilityInputActions 배열을 루프로 돌며 Ability들을 Binding 해주는 것을 확인할 수 있다.
플레이어 캐릭터 클래스인 "WarriorHeroCharacter"에서 RPGInputComponent::BindAbilityInputAction 을 호출하여 모든 Ability에 대해 Input Binding을 시켜준다.
✅ Ability Input 등록
🔎WarriorHeroCharacter 클래스 전체 코드
더보기
#pragma once

#include "CoreMinimal.h"
#include "Characters/RPGBaseCharacter.h"
#include "GameplayTagContainer.h"
#include "WarriorHeroCharacter.generated.h"

class USpringArmComponent;
class UCameraComponent;
class UDataAsset_InputConfig;
class UHeroCombatComponent;
struct FInputActionValue;

UCLASS()
class RPG_API AWarriorHeroCharacter : public ARPGBaseCharacter
{
	GENERATED_BODY()

public:
	AWarriorHeroCharacter();

protected:
	//~ Begin APawn Interface
	virtual void PossessedBy(AController* NewController) override;
	//~ End APawn Interface

	virtual void SetupPlayerInputComponent(class UInputComponent* PlayerInputComponent) override;
	virtual void BeginPlay() override;

private:

#pragma region Components

	UPROPERTY(VisibleAnywhere, BlueprintReadOnly, Category = "Camera", meta=(AllowPrivateAccess = "true"))
	TObjectPtr<USpringArmComponent> CameraBoom;

	UPROPERTY(VisibleAnywhere, BlueprintReadOnly, Category = "Camera", meta=(AllowPrivateAccess = "true"))
	TObjectPtr<UCameraComponent> FollowCamera;

	UPROPERTY(VisibleAnywhere, BlueprintReadOnly, Category = "Combat", meta=(AllowPrivateAccess = "true"))
	TObjectPtr<UHeroCombatComponent> HeroCombatComponent;

#pragma endregion

#pragma region Inputs

	UPROPERTY(EditDefaultsOnly, BlueprintReadOnly, Category = "CharacterData", meta = (AllowPrivateAccess = "true"))
	UDataAsset_InputConfig* InputConfigDataAsset;

	void Input_Move(const FInputActionValue& InputActionValue);
	void Input_Look(const FInputActionValue& InputActionValue);

	void Input_AbilityInputPressed(FGameplayTag InInputTag);
	void Input_AbilityInputReleased(FGameplayTag InInputTag);

#pragma endregion

public:
	FORCEINLINE UHeroCombatComponent* GetHeroCombatComponent() const { return HeroCombatComponent; }
};
#include "Characters/WarriorHeroCharacter.h"
#include "Components/CapsuleComponent.h"
#include "GameFramework/CharacterMovementComponent.h"
#include "GameFramework/SpringArmComponent.h"
#include "Camera/CameraComponent.h"
#include "EnhancedInputSubsystems.h"
#include "DataAssets/Input/DataAsset_InputConfig.h"
#include "Components/Input/RPGInputComponent.h"
#include "RPGGameplayTags.h"
#include "AbilitySystem/RPGAbilitySystemComponent.h"
#include "DataAssets/StartUpData/DataAsset_HeroStartUpData.h"
#include "Components/Combat/HeroCombatComponent.h"
#include "WarriorDebugHelper.h"
AWarriorHeroCharacter::AWarriorHeroCharacter()
{
GetCapsuleComponent()->InitCapsuleSize(42.0f, 96.0f);
bUseControllerRotationPitch = false;
bUseControllerRotationYaw = false;
bUseControllerRotationRoll = false;
CameraBoom = CreateDefaultSubobject<USpringArmComponent>(TEXT("CameraBoom"));
CameraBoom->SetupAttachment(GetRootComponent());
CameraBoom->TargetArmLength = 200.0f;
CameraBoom->SocketOffset = FVector(0.0f, 55.0f, 65.0f);
CameraBoom->bUsePawnControlRotation = true;
FollowCamera = CreateDefaultSubobject<UCameraComponent>(TEXT("FollowCamera"));
FollowCamera->SetupAttachment(CameraBoom, USpringArmComponent::SocketName);
FollowCamera->bUsePawnControlRotation = false;
GetCharacterMovement()->bOrientRotationToMovement = true;
GetCharacterMovement()->RotationRate = FRotator(0.0f, 500.0f, 0.0f);
GetCharacterMovement()->MaxWalkSpeed = 400.0f;
GetCharacterMovement()->BrakingDecelerationWalking = 2000.0f;
HeroCombatComponent = CreateDefaultSubobject<UHeroCombatComponent>(TEXT("HeroCombatComponent"));
}
void AWarriorHeroCharacter::PossessedBy(AController* NewController)
{
Super::PossessedBy(NewController);
if (!CharacterStartUpData.IsNull())
{
if (UDataAsset_StartUpDataBase* LoadedData = CharacterStartUpData.LoadSynchronous())
{
LoadedData->GiveToAbilitySystemComponent(RPGAbilitySystemComponent);
}
}
}
void AWarriorHeroCharacter::SetupPlayerInputComponent(UInputComponent* PlayerInputComponent)
{
ULocalPlayer* LocalPlayer = GetController<APlayerController>()->GetLocalPlayer();
check(LocalPlayer);
UEnhancedInputLocalPlayerSubsystem* Subsystem = ULocalPlayer::GetSubsystem<UEnhancedInputLocalPlayerSubsystem>(LocalPlayer);
check(Subsystem);
Subsystem->AddMappingContext(InputConfigDataAsset->DefaultMappingContext, 0);
URPGInputComponent* RPGInputComponent = CastChecked<URPGInputComponent>(PlayerInputComponent);
RPGInputComponent->BindNativeInputAction(InputConfigDataAsset, RPGGameplayTags::InputTag_Move, ETriggerEvent::Triggered,this, &ThisClass::Input_Move);
RPGInputComponent->BindNativeInputAction(InputConfigDataAsset, RPGGameplayTags::InputTag_Look, ETriggerEvent::Triggered,this, &ThisClass::Input_Look);
RPGInputComponent->BindAbilityInputAction(InputConfigDataAsset, this, &ThisClass::Input_AbilityInputPressed, &ThisClass::Input_AbilityInputReleased);
}
void AWarriorHeroCharacter::BeginPlay()
{
Super::BeginPlay();
}
void AWarriorHeroCharacter::Input_Move(const FInputActionValue& InputActionValue)
{
const FVector2D MovementVector = InputActionValue.Get<FVector2D>();
const FRotator MovementRotation(0.0f, Controller->GetControlRotation().Yaw, 0.0f);
if (MovementVector.Y != 0.0f)
{
const FVector ForwardDirection = MovementRotation.RotateVector(FVector::ForwardVector);
AddMovementInput(ForwardDirection, MovementVector.Y);
}
if (MovementVector.X != 0.0f)
{
const FVector RightDirection = MovementRotation.RotateVector(FVector::RightVector);
AddMovementInput(RightDirection, MovementVector.X);
}
}
void AWarriorHeroCharacter::Input_Look(const FInputActionValue& InputActionValue)
{
const FVector2D LookAxisVector = InputActionValue.Get<FVector2D>();
if (LookAxisVector.X != 0.0f)
{
AddControllerYawInput(LookAxisVector.X);
}
if (LookAxisVector.Y != 0.0f)
{
AddControllerPitchInput(LookAxisVector.Y);
}
}
void AWarriorHeroCharacter::Input_AbilityInputPressed(FGameplayTag InInputTag)
{
RPGAbilitySystemComponent->OnAbilityInputPressed(InInputTag);
}
void AWarriorHeroCharacter::Input_AbilityInputReleased(FGameplayTag InInputTag)
{
RPGAbilitySystemComponent->OnAbilityInputReleased(InInputTag);
}🔹 WarriorHeroCharacter.h
UCLASS()
class RPG_API AWarriorHeroCharacter : public ARPGBaseCharacter
{
	GENERATED_BODY()

public:
	AWarriorHeroCharacter();

protected:
	virtual void SetupPlayerInputComponent(class UInputComponent* PlayerInputComponent) override;

#pragma region Inputs

	UPROPERTY(EditDefaultsOnly, BlueprintReadOnly, Category = "CharacterData", meta = (AllowPrivateAccess = "true"))
	UDataAsset_InputConfig* InputConfigDataAsset;

	void Input_Move(const FInputActionValue& InputActionValue);
	void Input_Look(const FInputActionValue& InputActionValue);

	void Input_AbilityInputPressed(FGameplayTag InInputTag);
	void Input_AbilityInputReleased(FGameplayTag InInputTag);

#pragma endregion

}
🔹 WarriorHeroCharacter.cpp
void AWarriorHeroCharacter::SetupPlayerInputComponent(UInputComponent* PlayerInputComponent)
{
	ULocalPlayer* LocalPlayer = GetController<APlayerController>()->GetLocalPlayer();
	check(LocalPlayer);

	UEnhancedInputLocalPlayerSubsystem* Subsystem = ULocalPlayer::GetSubsystem<UEnhancedInputLocalPlayerSubsystem>(LocalPlayer);
	check(Subsystem);

	Subsystem->AddMappingContext(InputConfigDataAsset->DefaultMappingContext, 0);

	URPGInputComponent* RPGInputComponent = CastChecked<URPGInputComponent>(PlayerInputComponent);

	RPGInputComponent->BindNativeInputAction(InputConfigDataAsset, RPGGameplayTags::InputTag_Move, ETriggerEvent::Triggered,this, &ThisClass::Input_Move);
	RPGInputComponent->BindNativeInputAction(InputConfigDataAsset, RPGGameplayTags::InputTag_Look, ETriggerEvent::Triggered,this, &ThisClass::Input_Look);

    // Ability관련 InputAction 바인딩
	RPGInputComponent->BindAbilityInputAction(InputConfigDataAsset, this, &ThisClass::Input_AbilityInputPressed, &ThisClass::Input_AbilityInputReleased);
}

void AWarriorHeroCharacter::Input_AbilityInputPressed(FGameplayTag InInputTag)
{
	RPGAbilitySystemComponent->OnAbilityInputPressed(InInputTag);
}

void AWarriorHeroCharacter::Input_AbilityInputReleased(FGameplayTag InInputTag)
{
	RPGAbilitySystemComponent->OnAbilityInputReleased(InInputTag);
}
Character 클래스에서 Ability를 직접 활성화 시키지 않고, ASC에 위임한다.
✅ ASC에서 Ability 활성화 로직 작성
🔹 RPGAbilitySystemComponent.h
#pragma once

#include "CoreMinimal.h"
#include "AbilitySystemComponent.h"
#include "RPGAbilitySystemComponent.generated.h"

UCLASS()
class RPG_API URPGAbilitySystemComponent : public UAbilitySystemComponent
{
	GENERATED_BODY()

public:
	void OnAbilityInputPressed(const FGameplayTag& InInputTag);
	void OnAbilityInputReleased(const FGameplayTag& InInputTag);
};
🔹 RPGAbilitySystemComponent.cpp
#include "AbilitySystem/RPGAbilitySystemComponent.h"
#include "WarriorDebugHelper.h"

void URPGAbilitySystemComponent::OnAbilityInputPressed(const FGameplayTag& InInputTag)
{
	if (!InInputTag.IsValid())
	{
		FString msg = FString::Printf(TEXT("Not Valied InputTag %s"), *InInputTag.ToString());
		Debug::Print(msg);
		return;
	}

	for (const FGameplayAbilitySpec& AbilitySpec : GetActivatableAbilities())
	{
		if (!AbilitySpec.DynamicAbilityTags.HasTagExact(InInputTag)) continue;

		TryActivateAbility(AbilitySpec.Handle);
	}
}

void URPGAbilitySystemComponent::OnAbilityInputReleased(const FGameplayTag& InInputTag)
{
}


컴파일 후, 에디터로 돌아와 몇 가지 확인을 한다.
1. IMC에 InputAction이 바인딩 되었는가
2. DA_InputConfig에 Ability 관련 리스트에 InputTag와 InputAction이 적절히 할당되었는가
3. DA_HeroStartUpData에 Tag와 GameplayAbility가 적절히 할당되었는가
📌 Ability에 맞는 애니메이션 재생 및 무기 장착
앞선 과정을 통해 Ability를 등록하고 Input을 바인딩해, 특정 키를 입력하면 Ability가 활성화 되는 것 까지 진행했다.
이제 실제로 "GA_EquipAxe" Ability를 활성화 시켰을 때, 무기를 장착하는 애니메이션을 재생하고 무기를 장착하는 과정을 진행하려한다.
✅ 애니메이션 몽타주 생성 및 플레이

우리는 이동 중(Locomotaion Anim 재생 중)일 때도 무기를 장착하고 장착 해제가 가능해야 하기 때문에, 슬롯을 상-하체로 나눠 애니메이션을 재생해야한다.
애니메이션의 루트 모션이 활성화 되어있다면 해당 애니메이션이 재생되는 동안에는 움직일 수 없기 때문에, 무기를 장착하는 애니메이션 시퀀스에서 "Enable Root Motion"이 비활성화 시켜주어야한다.

루트 모션에 대한 확인이 끝났으면, 컨텐츠 브라우저로 돌아와 해당 애니메이션 우클릭→Create→Create AnimMontage를 선택해 애니메이션 몽타주를 생성해준다.

몽타주를 생성하면 네이밍이 접미어로 "Montage"가 붙는데, 우클릭하여 다음과 같이 선택하면 "AM" 접두어가 자동으로 붙으며 네이밍 컨벤션이 정리된다.

생성한 애니메이션 몽타주에서 "Anim Slot Manager" 창을 켜주고, Add Slot하여 "UpperBodySlot"을 생성해준다.

아래 시퀀스 창에서 Slot을 클릭→Slot name→UpperBodySlot으로 설정하여, 해당 애니메이션 몽타주가 UpperBodySlot에서 재생되도록 설정한다.

HeroCharacter의 ABP를 다음과 같이 수정하였다.
기존 Locomotion State를 캐싱해주고, "Layer blend per bone" 노드를 통해 상체와 하체를 분리해주었다.
Basepose에는 기존 캐싱된 Locomotion을 그대로 연결해주고, BlendPoses에는 캐싱된 포즈를 "Upper Body Slot"에서 재생되도록 설정해준다.
마지막으로 "Layer blend per bone" 클릭 후 Layer Setup을 추가해 spine_01 본을 기점으로 블랜딩하도록 설정해준다.
🔹 GA_Hero_EquipAxe에서 애니메이션 재생

이제 GameplayAbility에서 능력이 활성화 되었을 때, 애니메이션을 재생시켜준다.
앞서 만들었던 Animation Montage를 선택해주고 각 상황에 맞게 End Ability에 OutPin을 연결해준다.
"On Blend In" Out Pin의 경우, 애니메이션 몽타주가 막 시작되자마자 End Ability가 호출되면 애니메이션이 정상적으로 재생되지 않기 때문에 이 핀에는 연결하지 않는다.
해당 핀은 애니메이션이 시작될 때, 사운드 재생이나 효과를 출력하는데에 적절하다.
🔎PlayMontageAndWait 노드
이 노드는 일반적인 Play Montage와는 다르게 GAS 전용으로 설계된 Async Task 노드이며, GameplayAbility 클래스 내에서만 사용 가능하다.
GAS안에서 특정 AnimMontage를 재생하고, 그 재생 상태에 따른 다양한 이벤트를 받을 수 있도록 설계되어있다.
🔎각 이벤트 핀의 역할
- On Completed: 몽타주 애니메이션이 정상적으로 마지막 프레임까지 재생되고 자연스럽게 종료되었을 때
- On Blend In: UE 5.2 이상에서 새로 추가된 이벤트로, 몽타주가 처음 Blend In 되어 정식 재생이 시작되는 순간 호출
- On Blend Out: 애니메이션이 블랜드 아웃(전환) 상태로 들어가는 순간 호출
- On Interrupted: 애니메이션이 다른 애니메이션으로 강제 중단되었거나 캐릭터 동작에 의해 취소된 경우
- On Cancelled: Ability가 외부 요인에 의해 강제로 종료되었을 경우
🔔 애니메이션 재생 테스트

정상적으로 움직일 때도 Ability가 활성화되면, 자연스럽게 이동 중에 무기를 꺼내는 애니메이션이 재생되는 것을 확인할 수 있었다.
✅ 무기를 꺼내는 타이밍에 맞춰 무기 장착
무기를 꺼내는 애니메이션의 특정 지점에 맞춰 등에 있는 소켓에서 손으로 무기를 옮겨서 장착을 해야한다.
이는 Animation Notify를 사용하면 쉽게 처리할 수 있다.
AnimNotify 클래스를 생성하기 이전에, AnimNotify에서 어떤 이벤트를 전달할건지 Event관련 Tag를 먼저 추가하도록 한다.
🔹 RPGGameplayTags.h
#pragma once

#include "NativeGameplayTags.h"

namespace RPGGameplayTags
{
	/** Input Tags */
	RPG_API UE_DECLARE_GAMEPLAY_TAG_EXTERN(InputTag_Move);
	RPG_API UE_DECLARE_GAMEPLAY_TAG_EXTERN(InputTag_Look);
	RPG_API UE_DECLARE_GAMEPLAY_TAG_EXTERN(InputTag_EquipAxe);
	RPG_API UE_DECLARE_GAMEPLAY_TAG_EXTERN(InputTag_UnequipAxe);

	/** Player Tags */
	RPG_API UE_DECLARE_GAMEPLAY_TAG_EXTERN(Player_Weapon_Axe);

    // 도끼 장착 및 해제 Event Tag 추가
	RPG_API UE_DECLARE_GAMEPLAY_TAG_EXTERN(Player_Event_Equip_Axe);
	RPG_API UE_DECLARE_GAMEPLAY_TAG_EXTERN(Player_Event_Unequip_Axe);
}
🔹 RPGGameplayTags.cpp
#include "RPGGameplayTags.h"

namespace RPGGameplayTags
{
	/** Input Tags */
	UE_DEFINE_GAMEPLAY_TAG(InputTag_Move, "InputTag.Move");
	UE_DEFINE_GAMEPLAY_TAG(InputTag_Look, "InputTag.Look");
	UE_DEFINE_GAMEPLAY_TAG(InputTag_EquipAxe, "InputTag.EquipAxe");
	UE_DEFINE_GAMEPLAY_TAG(InputTag_UnequipAxe, "InputTag.UnequipAxe");

	/** Player Tags */
	UE_DEFINE_GAMEPLAY_TAG(Player_Weapon_Axe, "Player.Weapon.Axe");

	UE_DEFINE_GAMEPLAY_TAG(Player_Event_Equip_Axe, "Player.Event.Equip.Axe");
	UE_DEFINE_GAMEPLAY_TAG(Player_Event_Unequip_Axe, "Player.Event.Unequip.Axe");
}


에디터 컨텐츠 브라우저에서 "AnimNotify"를 상속받는 BP 클래스를 생성해주고 "AN_SendGameplayEventToOwner" 명명한다.

AnimNotify 내부에 다음과 같이 로직을 작성한다.
"Send Gameplay Event to Actor" 노드는 GAS에서 사용되는 핵심 노드(함수) 중 하나로, ASC가 부착된 액터에게 Gameplay Event를 트리거 하는 기능을 한다.
즉, 어떤 액터에게 특정 태그를 기반으로 한 이벤트를 전달해서, 그 액터가 해당 이벤트에 대해 반응할 수 있도록 한다.
이 AnimNotify는 여러 몽타주에 반복적으로 사용될 것이다.
현재의 상황에선 도끼를 장착하는 Ability 내부의 "Wait Gameplay Event" 노드가 대기 중인 이벤트를 수동으로 발생시켜주는 트리거 역할을 한다.
뒤에서 "GA_Hero_EquipAxe" Ability에서 "Wait Gameplay Event"노드로 Tag를 포함한 이벤트를 받아줄 것이다.

등에 있는 무기를 잡고 꺼내는 시점에 맞춰서, 앞서 만들었던 AnimNotify를 배치하고, 앞서 추가했던 도끼를 꺼내는 Event Tag(Player.Event.Equip.Axe)를 설정해준다.
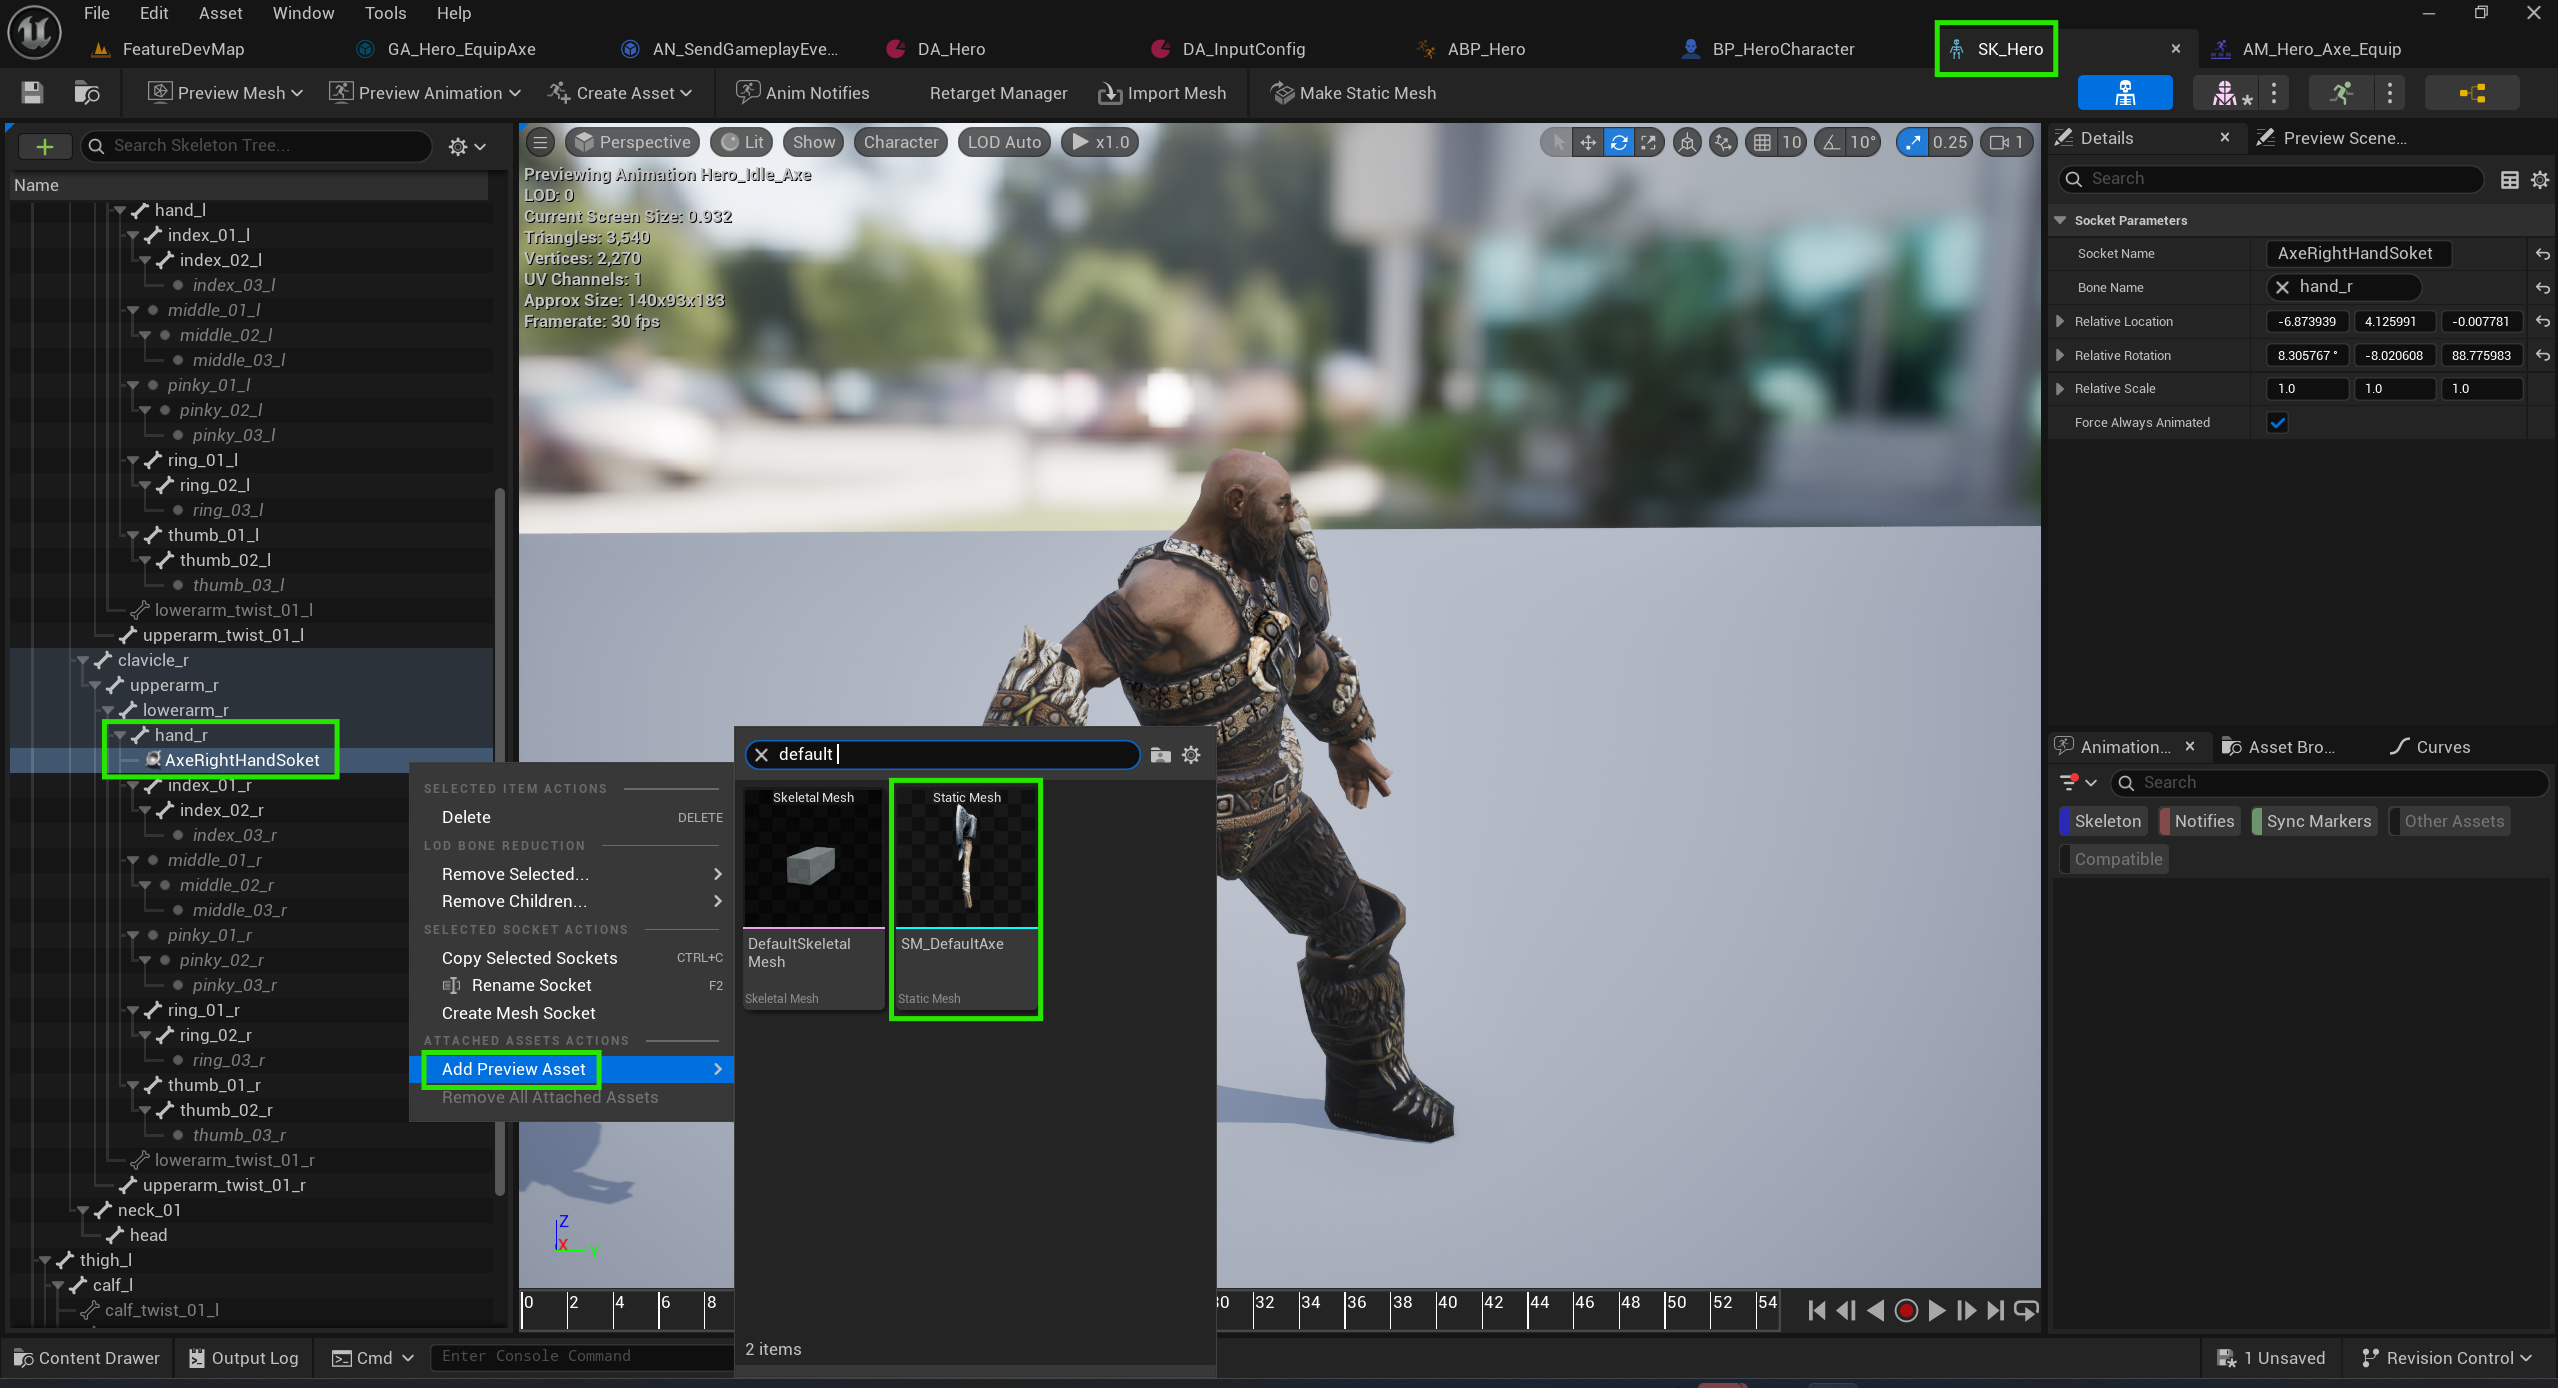
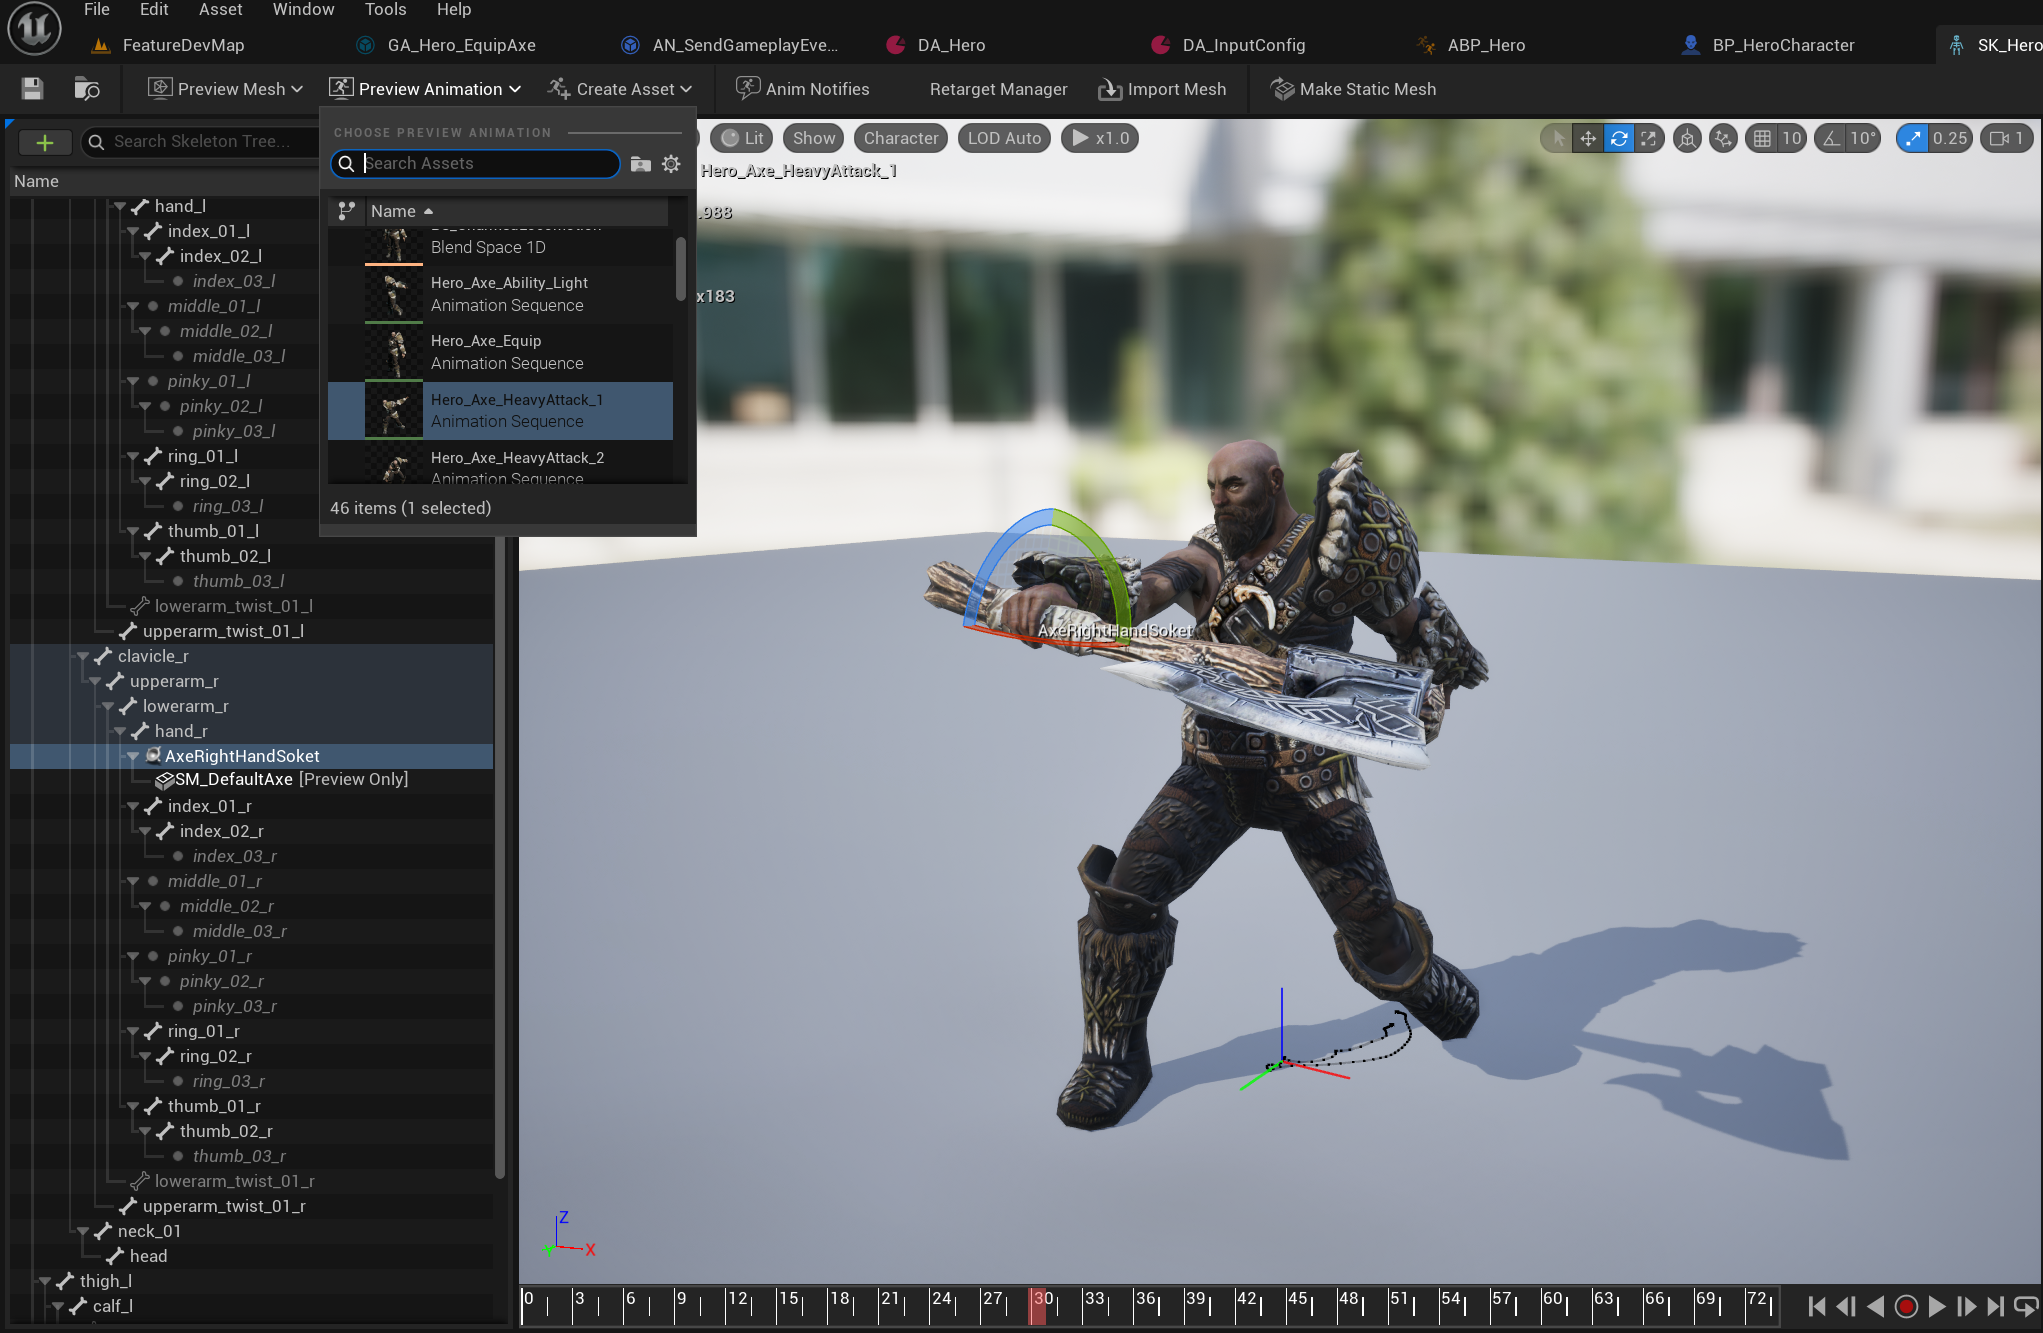
이제 AnimNotify로 이벤트를 받았을 때, 손으로 무기를 옮겨야 하기 때문에 Skeletal Mesh에서 오른손의 소켓을 추가한다.
Add Preview Asset으로 무기 메시를 손에 쥐고, Preview Animation으로 도끼를 들고 있는 Idle 상태와 실제 공격하는 Animation에서 자연스러운 소켓 위치를 잡아준다.


소켓과 Notify설정이 끝났다면 마지막으로 GameplayAbility로 돌아와 다음과 같이 설정해준다.
앞서 설명했듯이 AnimNotify에서 "Send Gameplay Event to Actor" 노드를 통해 Event관련 GameplayTag와 함께 이벤트를 보내면, GA에서 "Wait Gameplay Event" 노드를 통해 이벤트를 수신 받고 무기를 손으로 Attach 하게된다.
Target의 경우 이전에 CombatComponent에서 무기를 Tag기반으로 TMap 컨테이너에 저장해두었다.
그리고 플레이어 전용 GA C++ 클래스에서 만들어두었던 CombatComponent를 가져오는 헬퍼함수를 사용해서 Tag기반으로 무기를 검색해 설정해주었다.
결과적으로 Actor Info 기반으로 Skeletal Mesh의 지정된 소켓(손)으로 무기를 부착시키는 로직이 완성되었다.
🔔 무기 장착 테스트
